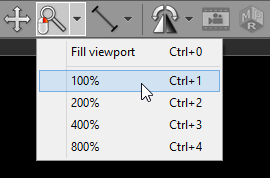
Image zooming
Click the Zoom image button on the toolbar (or press the Z key).

Next, press left mouse button over the image and drag the mouse Up to zoom in or Down to zoom out.
By default, the zooming tool is associated with the right mouse button.
Another way to zoom is to place the cursor over the image, press the Ctrl key, and turn the mouse wheel in both directions to zoom in or out.
Alternatively, the Ctrl + Plus (+) and Ctrl + Minus (-) keyboard shortcuts can be used to zoom.
On multi-touch devices, touch the image with two fingers and drag them apart to zoom in, or toward each other to zoom out.
Different zoom presets can be quickly applied by pressing Ctrl + 0-4
Key |
Preset |
Ctrl + 0 |
Fill viewport with image |
Ctrl + 1 |
100% (1 image pixel = 1 screen pixel) |
Ctrl + 2 |
200% (1 image pixel = 2 screen pixels) |
Ctrl + 3 |
400% (1 image pixel = 4 screen pixels) |
Ctrl + 4 |
800% (1 image pixel = 8 screen pixels) |
These presets are also available from the Zoom image drop down menu.

Image panning
When an image is zoomed in, panning can be used to reveal areas lying outside the viewing panel.
Click the Pan image button on the toolbar (or press the M key).

Next, press the left mouse button over the image and drag the mouse to move image around the screen.
By default, the image panning tool is associated with the back (4th) mouse button.
Press the Shift key and drag mouse with the left button down, and the panning tool will be active regardless of the current left mouse button association.
Alternatively, Ctrl + Arrows (Up, Down, Left or Right) can be used to pan.
On multi-touch devices, touch the image with two fingers and drag them across the panel to move image. Keep the distance between the fingers unchanged to maintain the current zoom ratio.
Press Ctrl + 0 to revert the zoom and pan settings and fill the viewport with the image.